


Shinobi Legacy
Wikipedia
Game systems, mechanics, and everything you need to know.
Companion System
Pets
Overview
Pets are unique creatures in the Shinobi World, each with special abilities to enhance your experience. They can restore your Chakra or Health Points, locate enemies, and even gather money for you. Pets follow their owners throughout the world, providing valuable support.
Pets can be obtained from a Pet Box , which in turn can be drawn from an Unknown Box
  .
.
Pets can be obtained from a Pet Box
, which in turn can be drawn from an Unknown Box .
Available Pets

Gamakichi
Source: Unknown Box
Ability: 7% chakra / 5 sec

Katsuyu
Source: Hazard Box
Ability: 7% health / 5 sec

Gamatatsu
Source: Hazard Box
Ability: 3.5% HP & chakra / 5 sec

Tonton
Source: Hazard Box
Ability: Collects money for player

Pakkun
Source: Hazard Box
Ability: Tracks players with 0 chakra

Sharingan Creature
Source: Hazard Box
Ability: Teleport via space-time portals

Mini Shukaku
Source: Shukaku Event
Ability: 8% protection all (temporary)

Onbu
Source: Quest: Masaki (Konoha)
Ability: 2% chakra / 5 sec
Enhancement System
Upgrades
Overview
The Upgrade System allows you to enhance your weapons, making them more powerful and resilient. However, the path to upgrading is filled with risk — careful consideration is needed to avoid losing valuable gear.
Upgrade Levels
Only weapons with tiers +2 or +3 can be upgraded, with a maximum of +10. Each successful upgrade increases both attack and defense stats by 10%, making your equipment significantly more potent.
Upgrading Process
To initiate an upgrade, you need an Upgrade Kit  . This kit doesn't guarantee success — if the upgrade fails, the item is destroyed forever.
To protect your item, place an Upgrade Seal in your backpack during the attempt. It will safeguard the item from destruction on failure, but the seal itself is always consumed — whether the upgrade succeeds or fails.
. This kit doesn't guarantee success — if the upgrade fails, the item is destroyed forever.To protect your item, place an Upgrade Seal
in your backpack during the attempt. It will safeguard the item from destruction on failure, but the seal itself is always consumed — whether the upgrade succeeds or fails.
Tools
Upgrade Kit
Source: NPC: Sally
Use: Upgrades weapons (risk involved)
Upgrade Seal
Source: Shinobi Legacy Gamestore
Use: Protects weapon on failed upgrade

Upgrade Kit
Source: Quest: Kumo-Gakure Citizen Quest 1
Use: Upgrades weapons (risk involved). Works only with gold Upgrade Seal.

Upgrade Seal
Source: Quest: Kumo-Gakure Citizen Quest 2
Use: Protects weapon on failed upgrade. Works only with gold Upgrade Kit.
Item Empowerment
Chakra Infusion
Overview
The Chakra Infusion System lets you socket Chakra Pieces into your equipment, embedding them with powerful hidden bonuses. Every piece of gear carries an internal item level — the stronger the monster it dropped from, the higher that item level, and the better the bonus range you can roll when infusing it.
Item Rarity & Chakra Slots
Every item has a rarity, and rarity determines how many Chakra slots it has available for infusion. The higher the rarity, the more attributes you can socket into a single item.
| Rarity | Chakra Slots |
|---|---|
| Common | 0 slots (cannot be Chakra infused) |
| Rare | 1 slot |
| Epic | 2 slots |
| Legendary | 3 slots |
| Brutal | 4 slots |
Orange Chakra Pieces
Orange Chakra Pieces can be socketed into any equippable item and grant a random bonus drawn from the full attribute pool below. The specific piece required depends on the item's level bracket — higher brackets roll stronger, rarer bonuses.
Orange Chakra Pieces are consumed on use and cannot be retrieved once socketed — removing them destroys the last bonus permanently.
They can be obtained by completing the Chakra Village Quest or purchased directly from the Shinobi Legacy Game Shop.
Orange Chakra Pieces are consumed on use and cannot be retrieved once socketed — removing them destroys the last bonus permanently.
They can be obtained by completing the Chakra Village Quest or purchased directly from the Shinobi Legacy Game Shop.
Item Level Brackets
| Item Level Range | Required Piece | |
|---|---|---|
| Level 1 – 9 | Orange Chakra Piece (Tier 1) | |
| Level 10 – 24 | Orange Chakra Piece (Tier 2) | |
| Level 25 – 39 | Orange Chakra Piece (Tier 3) | |
| Level 40 – 49 | Orange Chakra Piece (Tier 4) | |
| Level 50 – 64 | Orange Chakra Piece (Tier 5) | |
| Level 65 – 74 | Orange Chakra Piece (Tier 6) | |
| Level 75 – 99 | Orange Chakra Piece (Tier 7) | |
| Level 100 - 119 | Orange Chakra Piece (Tier 8) | |
| Level 120 | Orange Chakra Piece (Tier 9) |
Blue Chakra Piece
The Blue Chakra Piece can only be socketed into masks, granting a fixed +10 Ninjutsu bonus. Unlike orange pieces, it is fully retrievable — use a Chakra Remover to safely extract it from a mask and re-socket it into another one. Blue Chakra Pieces are sold exclusively at the Shinobi Legacy Game Shop.
Chakra Pieces & Tools

Orange Chakra Piece
Source: Chakra Village Quest (Wise Sage), Game Shop
Effect: Random bonus by item level (not retrievable)

Blue Chakra Piece
Source: Shinobi Legacy Game Shop
Effect: Mask only: +10 Ninjutsu (retrievable)

Chakra Remover
Source: Shinobi Legacy Game Shop (Wise Sage)
Effect: Removes last attribute from slots, extracts a Blue Chakra Piece from a mask
Bonus Attribute Pool
One of the following attributes is rolled at random whenever an Orange Chakra Piece is socketed:
#1
Max Health +X
#2
Max Chakra +X
#3
Ninjutsu +X
#4
Fuuin Jutsu +X
#5
Taijutsu +X
#6
Sword Fighting +X
#7
Critical +X
#8
Distance Fighting +X
#9
Defense +X
#10
Control +X
#11
Attack Speed +X
#12
Critical Hit Chance +X%
#13
Extra Yen +X%
#14
Extra Experience +X%
#15
Speed +X
#16
Healing +X%
#17
Jutsu Protection PvP +X%
#18
Physical Protection PvP +X%
#19
Jutsu Protection PvE +X%
#20
Physical Protection PvE +X%
#21
Jutsu Damage PvP +X%
#22
Physical Damage PvP +X%
#23
Jutsu Damage PvE +X%
#24
Physical Damage PvE +X%
#25
Chakra Cost +X%
#26
Cooldown Reduction +X%
Skill Training
Critical Bands
Overview
Critical Bands are wearable training items used to raise your Critical skill, which increases your chance to land critical hits. Equip a band and it grants bonus training attempt — the higher tier the band, the faster your Critical skill progresses.
Band Hierarchy
Bands are ranked from weakest to strongest. Each tier grants a higher Bonus Try value, meaning more effective training rolls per hit:
| Tier | Band | Bonus Try |
|---|---|---|
| 1 | Brown Band | 1 |
| 2 | Red Band | 10 |
| 3 | Yellow Band | 30 |
| 4 | Green Band | 40 |
| 5 | Silver Band | 50 |
| 6 | Blue Band | 60 |
Obtaining Bands
Brown, Red, Yellow, and Green Bands drop directly from monsters out in the world.
Silver and Blue Bands are the top two tiers and can only be obtained from a Bands Box, purchasable at the Shinobi Legacy Game Shop.
Silver and Blue Bands are the top two tiers and can only be obtained from a Bands Box, purchasable at the Shinobi Legacy Game Shop.
Training
Equip any Critical Band to begin training your Critical skill. Every successful hit gives your band a chance to trigger, based on its Bonus Try value — higher tier bands trigger more often, meaning noticeably faster Critical skill gains and a quicker climb toward higher critical hit chance.
Available Bands

Brown Band
Source: Dropped by monsters
Bonus Try: 1

Red Band
Source: Dropped by monsters
Bonus Try: 10

Yellow Band
Source: Dropped by monsters
Bonus Try: 30

Green Band
Source: Dropped by monsters
Bonus Try: 40

Silver Band
Source: Bands Box (Shinobi Legacy Game Shop)
Bonus Try: 50

Blue Band
Source: Bands Box (Shinobi Legacy Game Shop)
Bonus Try: 60
Item Creation
Crafting
Overview
The crafting system allows players to create valuable items. Crafting can significantly enhance your gear and boost your abilities.
How to Start Crafting
Complete the Blacksmith Quest in Iwa-Gakure to gain access to the Anvil — the special tool required for crafting. Once unlocked, interact with the Anvil to craft from a range of items:
Weapons Armor
Weapons Armor
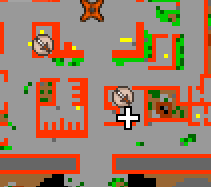
The Blacksmith NPC in Iwa-Gakure.
Crafting Ingredients

Iron Ore
From: Turquoise Monk, Juuhi Assassin, Fishman, Bones, Hanabi

Gold Ore
From: Turquoise Monk, Juuhi Assassin, Fishman, Bones, Hanabi

Bloodstone Ore
From: Ankoku Monk, Katon Monk, Guren, Hardsteeled, Akahoshi Hatsuhi

Katon Essence
From: Katon Monk, Zenkai, Hardsteeled, Turquoise Juuhi Assassin

Raiton Essence
From: Turquoise Juuhi Assassin, Turquoise Monk, Fishman, Raiga Kurosuki

Bright Amethyst
From: Icy Machinery

Fossil Core
From: Fossilman

Insect Venom
From: Huge Insect, Insect

Sage
From: Suiton Monk

Shadow Fabric
From: Shadow Hunter

Shaman Bones
From: Shaman
Combat Mechanic
Anger System
Overview
Your ability to unleash powerful jutsu is directly tied to your anger levels. The more anger points you accumulate, the shorter your cooldowns become, allowing for more frequent and devastating attacks.
Anger Points
Every time you kill a monster, you gain 1 anger point. In a party, the anger points are multiplied by the number of members — a party of four grants 4 anger points per kill.
You can use Adrenalines to instantly boost anger points, capped at 40 points. Beyond this limit, only killing monsters will increase your anger further.
You can use Adrenalines
to instantly boost anger points, capped at 40 points. Beyond this limit, only killing monsters will increase your anger further.
Strategic Use
As anger points rise, cooldowns decrease, enabling more rapid jutsu usage. Managing your anger levels strategically can be the key to turning the tide in battle. Embrace your fury, master your anger, and dominate the battlefield with relentless jutsu!
Tools
Adrenaline
Source: Hospital Medic
Boost: +10 anger points
Price: 40 green yen notes
Protection Items
Rings
Overview
Unlock the power of protection with the exclusive Akatsuki and Sannin Rings, designed to safeguard your progress. Remember your equipment is protected until level 50!
Akatsuki Ring at Oto-Gakure — shields you from losing items upon death. Recharge using 2 Red Yen Notes and an Empty Akatsuki Ring
  at NPC Orochimaru in Oto-Gakure.
Akatsuki Ring at Kusa-Gakure — shields you from losing items upon death. Recharge using 4 Red Yen Notes and an Empty Akatsuki Ring at NPC Orochimaru in Kusa-Gakure.
Task Ring — shields you from losing items upon death. It can't be recharged. You can get it from Mission Grandmaster after finishing required tasks.
Sannin Ring — protects items, level, and skills. Perfect for PVP. Recharge with 2 Empty Sannin Rings and 4 Red Yen Notes at NPC Jiraiya.
Akatsuki Ring at Oto-Gakure — shields you from losing items upon death. Recharge using 2 Red Yen Notes
and an Empty Akatsuki Ring at NPC Orochimaru in Oto-Gakure.Akatsuki Ring at Kusa-Gakure — shields you from losing items upon death. Recharge using 4 Red Yen Notes
and an Empty Akatsuki Ring at NPC Orochimaru in Kusa-Gakure.Task Ring — shields you from losing items upon death. It can't be recharged. You can get it from Mission Grandmaster after finishing required tasks.
Sannin Ring — protects items, level, and skills. Perfect for PVP. Recharge with 2 Empty Sannin Rings
and 4 Red Yen Notes at NPC Jiraiya.
Map Walkthrough
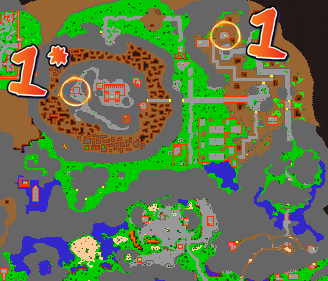
Akatsuki Ring: Two available entries leading to Orochimaru Hideout.
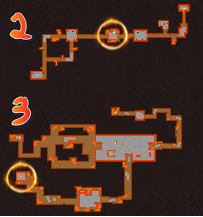
Akatsuki Ring: Follow the numbered path.
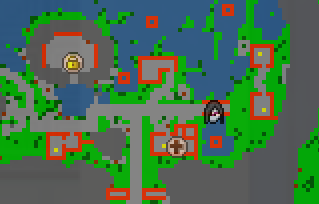
Akatsuki Ring: City (Kusa-Gakure) — where Orochimaru stays.
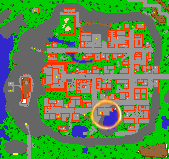
Sannin Ring: Hot Springs (Konoha-Gakure) — where Jiraiya stays.
Available Rings

Akatsuki Ring
Source: Unknown Box
Effect: Protects equipment on death

Sannin Ring
Source: Unknown Box
Effect: Protects equipment, level & skills

Task Ring
Source: Mission Grandmaster Tasks
Effect: Protects equipment on death
Instanced Content
Dungeons
Overview
Dungeons are instanced challenges where players fight through groups of monsters and defeat a final boss. Each dungeon offers increasing difficulty and rewards based on the selected level.
Dungeon Entry
To enter a dungeon, players must possess a special dungeon key. Without the required key, entry is not possible. Keys can be obtained from Rifts.
Difficulty Levels
Dungeons feature 6 difficulty levels. Each level increases the challenge and rewards:
Higher Monster HPIncreased DamageBonus EXPBetter Boss Rewards
Higher Monster HPIncreased DamageBonus EXPBetter Boss Rewards
Gameplay
Inside the dungeon, players clear monsters and progress through the area. At the end, a powerful boss awaits. Defeating the boss completes the run.
Party Play
Players can form parties to complete dungeons together. Teamwork makes it easier to handle stronger enemies and higher difficulties. Cooperation is key for efficient dungeon runs.
Rewards
After defeating the boss, a special reward chest spawns that must be destroyed to unlock its contents. It may contain Weapons or Armor. Each player also receives individual rewards separately.
Random Encounter
Rifts
Overview
Rifts are special encounters that randomly appear while gaining experience. A mysterious teleport may spawn near you, leading to a separate challenge area. Inside, players must complete objectives to earn valuable rewards.
Entering a Rift
While hunting, a Rift teleport can randomly spawn. Players can enter it to access the Rift instance. Once inside, you are locked in until the objective is completed or time runs out.
Rift Objectives
To complete a Rift, players must:
Kill Required MonstersDefeat the Rift Boss
Once all objectives are completed, the path forward unlocks.
Kill Required MonstersDefeat the Rift Boss
Once all objectives are completed, the path forward unlocks.
Difficulty
Rift monsters are significantly stronger than regular monsters found outside. They deal more damage and are harder to defeat. Players should prepare carefully and consider teaming up.
Party Contribution
If you are in a party, Rift objectives are shared among all members. Kills made by teammates count toward the objective, allowing faster completion. You do not need to complete everything alone.
Rewards
After completing the objective, a wall disappears, granting access to the treasure room. The reward chest inside contains valuable loot and may include dungeon keys for accessing dungeon content.
Progression Mechanic
Stamina
Overview
The stamina system has a maximum of 20 hours. It determines how much experience you gain while hunting — the higher your stamina, the more efficient your leveling will be.
Experience Modifiers
| Stamina Range | Label | EXP Multiplier |
|---|---|---|
| 20h – 18h | Happy Hours | +20% (1.2×) |
| 18h – 12h | Normal | 1.0× |
| 12h – 6h | Reduced | 0.7× |
| 6h – 0h | Heavy Penalty | 0.5× |
Regeneration
Stamina regenerates only while offline or when stamina is switched off.
Happy Stamina (20h–18h): 1 stamina minute every 12 minutes of offline time.
Normal Stamina (18h–0h): 1 stamina minute every 1.5 minutes of offline time.
You can also refill stamina via Quests that reward Stamina Boxes. Turn off stamina using the smiley face button on your action bar.
Happy Stamina (20h–18h): 1 stamina minute every 12 minutes of offline time.
Normal Stamina (18h–0h): 1 stamina minute every 1.5 minutes of offline time.
You can also refill stamina via Quests that reward Stamina Boxes. Turn off stamina using the smiley face button on your action bar.
Stamina Rechargers

Stamina Box (1h)
Source: Quests
Effect: Recharges stamina by 1 hour

Stamina Box (3h)
Source: Quests
Effect: Recharges stamina by 3 hours
Offline Progression
Hirelings
Overview
Hirelings are valuable allies that provide various benefits, especially for training your skills and managing your storage. With the right hireling, you can continue developing your abilities even when not actively playing — exit the game and you will still be training.
Training Hireling
One key hireling specializes in training. Your character can continue training Taijutsu, Distance Fighting, and Sword Fighting even while offline. You can accumulate up to 12 hours of training time before needing to wait for recharge.
If you train while logged in inside a house, your character will be immobile until the session ends or you stop manually.
If you train while logged in inside a house, your character will be immobile until the session ends or you stop manually.
Stash Hireling
The Stash Hireling grants direct access to your Stash from inside your house — no need to travel to a Depot to deposit or withdraw items. Simply interact with the hireling to open your Stash on the spot.
This is especially useful for players who craft, hoard crafting ingredients, or frequently restock supplies, saving repeated trips back and forth to the Village Depot.
This is especially useful for players who craft, hoard crafting ingredients, or frequently restock supplies, saving repeated trips back and forth to the Village Depot.
Requirements
To hire either hireling, you must own a house. Both can be purchased from the Shinobi Legacy Gamestore.
Managing Hirelings
Once acquired, a hireling can be placed within your house up to 2 sqm from the doors. You can invite friends to train together, or let them use your Stash Hireling, inside your house.
To remove a hireling, use the Hireling Remover Scroll . If you leave or sell your house, the hireling will disappear.
To remove a hireling, use the Hireling Remover Scroll
. If you leave or sell your house, the hireling will disappear.
Social System
Guilds
Overview
The Guild System offers players a way to create and join player-run organizations. Guilds allow players to collaborate, compete, and grow stronger together. They can challenge other guilds to Guild Wars — large-scale PvP battles for dominance. Victorious guilds gain rewards and contribute to server-wide guild rankings.
Guild Creation
To create a guild, players must meet a minimum level requirement. The founder chooses a unique name and can customize the guild's banner. The creator becomes the Guild Leader, responsible for managing all operations.
Guild Management
The leader can assign ranks (Leader, Co-Leader, Officer, Member) with varying levels of privilege. Higher-ranked members can invite players, initiate wars, and manage guild resources.
Guild Donations
Members can donate Red Yen Notes into the guild's treasury. These contributions unlock new guild levels which provide special perks benefiting all members — larger member limits, stronger war capabilities, and more.
into the guild's treasury. These contributions unlock new guild levels which provide special perks benefiting all members — larger member limits, stronger war capabilities, and more.
Available Perks
Each row unlocks at a specific guild level, and only one perk per row can be chosen — leaders pick between the two options shown side by side.

Health Regeneration
Lv 2

Chakra Regeneration
Lv 2

Distance Fighting
Lv 4

Taijutsu & Sword Fighting
Lv 4

Movement Speed
Lv 6

Attack Speed
Lv 6

Physical Protection
Lv 8

Jutsu Protection
Lv 8

Critical
Lv 10

Ninjutsu
Lv 10

Control
Lv 12

Fuuin Jutsu
Lv 12

Protection vs Monsters
Lv 14

Protection vs Players
Lv 14

Damage vs Monsters
Lv 16

Damage vs Players
Lv 16

Chakra Cost Reduction
Lv 18

Cooldown Reduction
Lv 18
Daily Missions
Tasks
Overview
The Task System offers players various missions and challenges, providing an additional way to earn rewards such as experience and items. Each task can be run as either Daily or Normal — the player freely chooses which, per attempt.
Daily Tasks
Up to 2 tasks can be active as Daily at once, and up to 2 Daily completions (any tasks combined) are allowed within a rolling 24-hour window.
Daily tasks reward both Experience and Tasks Points. Once a specific task is completed as Daily, that same task is locked out of Daily mode for 24 hours — though it can still be run as Normal in the meantime.
Daily tasks reward both Experience and Tasks Points. Once a specific task is completed as Daily, that same task is locked out of Daily mode for 24 hours — though it can still be run as Normal in the meantime.
Normal Tasks
Up to 2 tasks can be active as Normal at once. Normal tasks reward Experience only — no Tasks Points.
Each individual task can be completed as Normal a maximum of 3 times per character, permanently. After that, the task is no longer available to that player as Normal (it can still be attempted as Daily, if not on cooldown).
Each individual task can be completed as Normal a maximum of 3 times per character, permanently. After that, the task is no longer available to that player as Normal (it can still be attempted as Daily, if not on cooldown).
Tasks Points & Rank
Tasks Points are earned exclusively from Daily task completions. As you accumulate points, your Tasks Rank increases, unlocking rewards that can be claimed at Mission Grandmaster in every Village.
Important Rules
Tasks are started by interacting with the Task Board, located in every Depot in every Village.
You may select how many monsters to kill for a task, between 50 and 1000. Selecting more kills increases the reward — every 100 kills beyond the minimum grants a percentage bonus to Points, Experience, and Gold rewards.
You may select how many monsters to kill for a task, between 50 and 1000. Selecting more kills increases the reward — every 100 kills beyond the minimum grants a percentage bonus to Points, Experience, and Gold rewards.